728x90

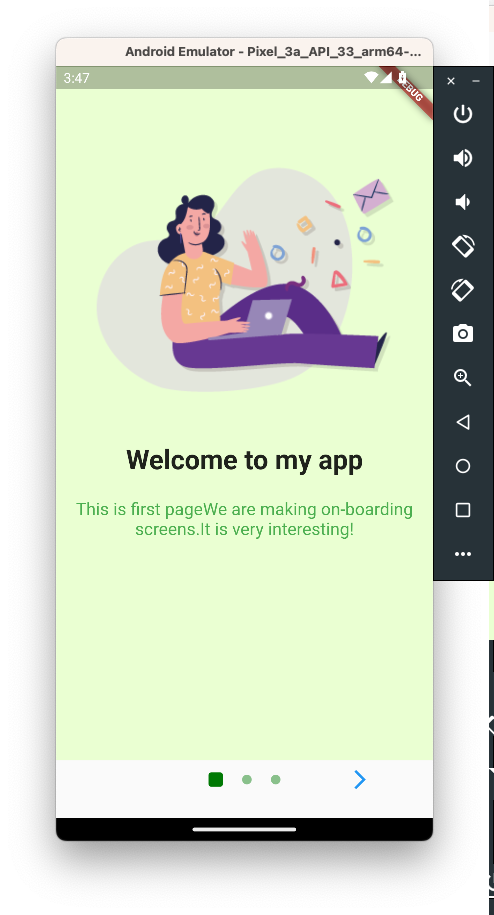
온보딩 스크린(Onboarding Screen)은 사용자가 처음으로 애플리케이션을 실행했을 때 서비스에 대한 소개 및 기능 안내를 도와주는 화면이다.
main.dart
import 'package:flutter/material.dart';
import 'onboarding.dart'; // onboarding.dart import

void main() {
  runApp(const MyApp());
}

class MyApp extends StatelessWidget {
  const MyApp({super.key});

  @override
  Widget build(BuildContext context) {
    return const MaterialApp(
      home: OnBoardingPage(), // onboarding.dart 파일의 OnBoardingPage()를 실행하도록 지정
    );
  }
}

class MyPage extends StatelessWidget {
  const MyPage({super.key});

  @override
  Widget build(BuildContext context) {
    return Scaffold(
      // Scaffold 위젯을 불러와 AppBar를 만듬
      appBar: AppBar(
        // Flutter 2.5 버전부터 한 번 정해지면 바뀌지 않는 데이터를 사용하는 위젯 앞에는 const 키워드를 붙이도록 되어있음
        title: const Text('Main Page'),
      ),
      body: Center(
        // Center 위젯을 불러와 child로 Column 위젯을 불러옴
        child: Column(mainAxisAlignment: MainAxisAlignment.center, children: [
          const Text(
            'Main Screen',
            style: TextStyle(
              fontSize: 25,
              fontWeight: FontWeight.bold,
            ),
          ),
          ElevatedButton(
            // ElevatedButton 위젯 생성
            onPressed: () {
              Navigator.of(context).push(
                MaterialPageRoute(
                    builder: (context) =>
                        const OnBoardingPage()), // MyPage 위젯 리턴
              );
            },
            child: const Text('Go to OnBoarding Screen'),
          ),
        ]),
      ),
    );
  }
}
onboarding.dart
import 'package:flutter/material.dart';
// 온보딩 스크인 외부패키지 임포트(https://pub.dev/packages/introduction_screen/install)
import 'package:introduction_screen/introduction_screen.dart';
import 'package:testflutter/main.dart';

class OnBoardingPage extends StatelessWidget {
  const OnBoardingPage({super.key});

  @override
  Widget build(BuildContext context) {
    return IntroductionScreen(
      pages: [
        // 대부분의 온보딩 스크린은 여러 페이지로 구성되어 있으므로
        // Column 위젯처럼 pages 아규먼트는 이처럼 리스트를 불러와야 함.
        // PageViewModel = 안에서 각 페이지 구성을 담당
        PageViewModel(
            // 첫번째 페이지
            title: 'Welcome to my app',
            body: 'This is first page'
                'We are making on-boarding screens.'
                'It is very interesting!',
            image: Image.asset('images/page1.png'),
            // 새로운 메서드를 하나 만들어 필요한 내용들을 미리 지정해두고 간단히 불러오기 위해 PageDecoration 사용
            decoration: getPageDecoration()),
        PageViewModel(
            // 두번째 페이지
            title: 'Welcome to my app',
            body: 'This is second page'
                'We are making on-boarding screens.'
                'It is very interesting!',
            image: Image.asset('images/page2.png'),
            decoration: getPageDecoration()),
        PageViewModel(
            // 세번째 페이지
            title: 'Welcome to my app',
            body: 'This is third page'
                'We are making on-boarding screens.'
                'It is very interesting!',
            image: Image.asset('images/page3.png'),
            decoration: getPageDecoration()),
      ],
      // done = 온보딩 스크린의 마지막 페이지까지 보았을 때 무엇을 할지 지정해주는 버튼
      done: const Text('Done'),
      // onDone = done 버튼이 터치가 되면 무엇을 할지 지정해주는 아규먼트
      // 대부분 온보딩 스크린이 끝나고 버튼을 누르면 앱의 시작 페이지로 이동(버튼의 onPressed 메서드와 동일)
      // push 메서드를 pushReplacement 메서드로 바꿀 경우 페이지를 다 보고 done을 눌렀을 때 메인 페이지에서 다시 온보드 페이지로 가는 뒤로가기 버튼 비활성화
      onDone: () {
        Navigator.of(context).push(
          MaterialPageRoute(
              builder: (context) => const MyPage()), // MyPage 위젯 리턴
        );
      },
      // next = 다음 페이지로 이동
      next: const Icon(Icons.arrow_forward_ios), // 아이콘도 지정되면 바뀌지 않으므로 const 처리
      // showBackButton = 뒤로가기 버튼 활성화 여부, 첫번째 페이지가 아닐 때 활성화
      showBackButton: true,
      back: const Icon(Icons.arrow_back_ios), // 아이콘도 지정되면 바뀌지 않으므로 const 처리,
      // // showSkipButton = 스킵 버튼 활성화 여부
      // showSkipButton: true,
      // // skip = 스킵 버튼
      // skip: const Text('skip'),
      // dotsDecorator = 하단의 페이지 점들에 대한 스타일 지정
      dotsDecorator: DotsDecorator(
        color: const Color.fromARGB(255, 137, 192, 139),
        activeColor: const Color.fromARGB(255, 0, 121, 4),
        size: const Size(10, 10),
        activeSize: Size(15, 15),
        spacing: EdgeInsets.all(10),
        activeShape: // shape 및 round 설정
            RoundedRectangleBorder(borderRadius: BorderRadius.circular(3)),
      ),
      // curve: Curves.bounceOut, // 넘김 애니메이션 속성
    );
  }

  // 클래스에 관련된 내용만을 다루어야 하므로 PageDecoration 타입의 getPageDecoration 클래스 생성
  // 실제 PageDecoration 클래스의 속성들은 필요한 것들만 그때그때 사용할 수 있도록 네임드 아규먼트로 구성되어 있기 때문에 메서드에 별 다른 인자값을 전달할 필요 없음
  // 메서드의 바디에서 PageDecoration 위젯을 리턴
  // 새롭게 생성된 PageDecoration 위젯 인스턴스 내에 원하는 아규먼트를 불러와서 페이지 디자인을 해주면 됨
  PageDecoration getPageDecoration() {
    return const PageDecoration(
      titleTextStyle: TextStyle(
        // 타이틀 텍스트 스타일
        fontSize: 28,
        fontWeight: FontWeight.bold,
      ),
      bodyTextStyle: TextStyle(
        // 본문 텍스트 스타일
        fontSize: 18,
        color: Colors.green,
      ),
      imagePadding: EdgeInsets.only(top: 40), // 이미지 padding
      pageColor: Color.fromARGB(255, 234, 255, 210), // 배경색상
    );
  }
}
참고.
728x90
'Flutter' 카테고리의 다른 글
| [Flutter] copyWith()로 위젯 속성 값 추가하기 (0) | 2022.11.16 |
|---|---|
| [Flutter] Custom Widget 사용하기 (0) | 2022.11.14 |
| [Flutter] UI 연습 (0) | 2022.11.14 |
| [Flutter] Flexible & Expanded 이해하기 (0) | 2022.11.09 |
| [Flutter] AppBar 사용하기 (0) | 2022.11.09 |